NZ Web Hosting & Domain Names
Cheeky Monkey Hosting

Support Centre

Please review our answers to the most common questions or browse our comprehensive knowledgebase before contacting our support team.

Visit Knowledgebase

Support request Help!

Before contacting us, we do ask that you please review our answers to the most common questions and browse our comprehensive knowledgebase.

Our servers are monitored 24/7/365 and we operate a pre-emptive error notification system whereby technicians are automatically alerted.

If you’re an existing Cheeky Monkey Hosting client, please login to your Client Area to receive support.

To check for any problems on our network, please visit our Live Network Status Information page.

Support

Frequently Asked Questions

Help, I can't access my email!

Don’t panic! In most cases, working through each of the following steps will likely resolve your issue:

Step 1: Emergency access to your email using WebMail

First of all, WebMail allows you to access your email from anywhere in the world using our WebMail applications – RoundCube and EnsigniaMail (NutsMail).

Step 2: Check our Live Network Status Information page

Our live network status information page is updated if any network or server issues are detected on our network.

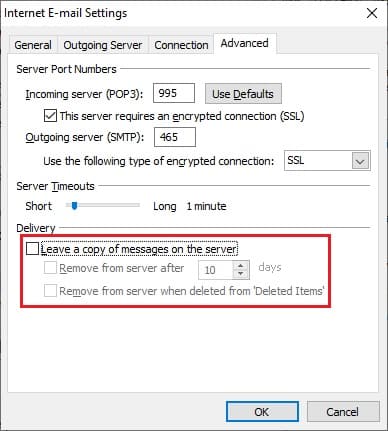
Step 3: Check all your email settings

Check your username, password, all your settings and connection details in your email program.

Tips when contacting our Support Team
  1. Please provide as much detail as possible as to the issue you are experiencing, including any errors and the name of your email program.
  2. Providing screenshots of the error/issue together with screenshots of your email account settings are also useful.
  3. Please send our support team only one email or open just one support ticket. Contacting us multiple times will only slow our response.

What are the correct settings for my email client?

Our servers support SSL on POP3, IMAP & SMTP, and also support normal (non-SSL) connections. These are our recommended email client settings:

Remember, your username is the mail account’s full email address so please replace username@domainname.co.nz with your full email address.

POP3

To setup your new email account using the POP protocol, you should use the following connection details in your email program:

User Name: Your mail account’s full email address (eg. username@domainname.co.nz)
Password: Password set for the email account in your Mail Control Panel
Incoming mail server (POP3): mailx.hosts.net.nz
Secure/Encrypted Connection: Enabled for SSL or SSL/TLS
Port number: 995

Outgoing mail server (SMTP): mailx.hosts.net.nz
Secure/Encrypted Connection: Enabled for SSL or SSL/TLS
Port number: 465 or 587
Authentication: Enabled and using the same username and password as for the incoming server.

IMAP

To setup your new email account using the IMAP protocol, you should use the following connection details in your email program:

User Name: Your mail account’s full email address (eg. username@domainname.co.nz)
Password: Password set for the email account in your Mail Control Panel
Incoming mail server (IMAP): mailx.hosts.net.nz
Secure/Encrypted Connection: Enabled for SSL or SSL/TLS
Port number: 993

Outgoing mail server (SMTP): mailx.hosts.net.nz
Secure/Encrypted Connection: Enabled for SSL or SSL/TLS
Port number: 465 or 587
Authentication: Enabled and using the same username and password as for the incoming server.

Help, I received a disk space warning email and have exhausted my email storage!

If you have received a disk space warning email such as “Mailbox approaching limit” which reads “You are now using over 75% of your allocated mail storage quota” then you should take action. As stated, the notification means that your mailbox on the mail server (not on your own computer) has gone over 75% of the allocated space.

This is what you should do:

1. Check your email disk usage

Login to your Mail Control Panel to view your disk usage.

Here you can view the individual mailbox quota assigned to each account and the space used by each account. After viewing your current disk usage, you may wish to allocate any free space available to your email account(s) or change the allocated email quota assigned to your email account(s).

If you find that you have little free space available you may need to consider the following options:

2. Delete old email using WebMail to free up disk space

Once you have identified the email account(s) that are full, login to each of the particular email account(s) using Webmail.

Removing email from webmail will free up space in the mailbox. If you only use Webmail or access your mail using an IMAP account, then removing these emails will permanently delete them. You can also check for spam or sent messages in their respective folders as these can often take up significant space as well. Finally, remember to empty the trash folder (purge).

3. Configure your email client to remove old email

If you use an email client to check your email (for example, Outlook, Windows Mail, Mozilla Thunderbird, Mac Mail, etc), you can configure your client to remove old email off the mail server to automatically tidy up your mailbox. To enable this for your POP account, go into the settings of your email client – go into the mail account and usually under the “advanced” section you will find the appropriate settings.

Here you can untick the option to “leave a copy of messages on the server” or set the number of days before your email client will remove any messages from the mail server. We recommend you do not leave a copy of messages on the server or reduce the number of days before removing messages from the mail server to say 3-5 days.

This is where these settings are found in Outlook:

Advanced email delivery settings
4. Upgrade your hosting package and increase your mailbox quota

If there is no more space available to allocate across your accounts, you may wish to consider upgrading your hosting package to the next plan. You can upgrade your service to a package which better suits your requirements at any time.

Help, I've forgotten my Client Area password!

If you’ve forgotten your Client Area password, you can enter the email address you use to login to your Client Area to begin the reset process:

Please check your email for instructions on what to do next.

If you don’t receive an email from us, either the email address you entered does not match an existing account or the email has been delivered to your spam folder – please check your spam folder.